In today’s digital landscape, APIs (Application Programming Interfaces) play a crucial role in connecting systems, applications, and services. With the growing reliance on APIs, ensuring their reliability, security, and performance through rigorous testing is essential. This guide explores the core components of an effective API testing methodology, covering different testing types, best practices, and tips for implementation.
1. Introduction to API Testing
- API testing involves testing APIs directly to ensure they fulfill expected functionality, reliability, performance, and security. Unlike UI testing, API testing bypasses the user interface and directly validates the application logic at the API layer.
- API testing tool that helps developers and testers create, test, and document APIs. It has a user-friendly interface that supports a variety of HTTP methods, authentication types, and data formats.
Why API Testing Matters
- APIs act as intermediaries for applications to communicate with one another. Proper API testing ensures seamless integration, efficient data exchanges, and secure information flows across systems.
- Testing your API is essential to the proper integration and delivery of quality software and product. Unlike UI testing, API automation testing is designed to withstand the short release cycles and frequent changes that occur while using best practices for software development and IT operations.
2. Types of API Testing:
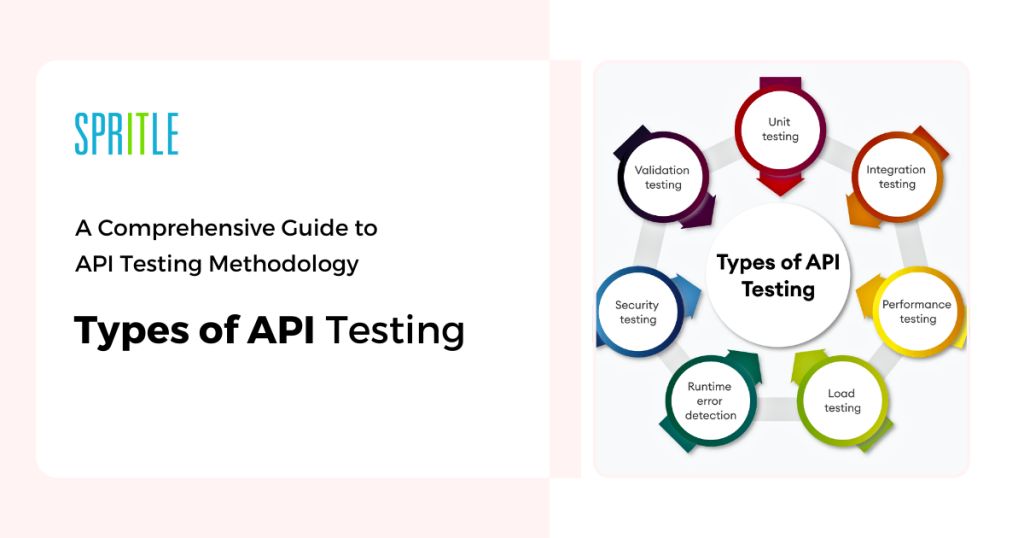
Understanding the different types of API testing helps testers address specific issues within an API’s functionality:
- Functional Testing: Validates that the API functions according to its specification, focusing on response data accuracy and correctness.
- Integration Testing: Ensures the API correctly interacts with other APIs, components, and services.
- Performance Testing: Performance testing is a testing measure that evaluates the speed, responsiveness and stability of a computer, network, software program or device under a workload.
- Load Testing: Tests the API under high volumes of requests to assess its stability, performance, and response times.
- Runtime Error Detection: Runtime error detection is a software verification method that analyzes a software application as it executes and reports defects that are detected during that execution.
- Security Testing: Identifies potential vulnerabilities, ensuring the API is protected against unauthorized access and data breaches.
- Validation Testing: Validation testing is the process of assessing a new software product to ensure that its performance matches consumer needs.
- Reliability Testing: Verifies the API’s ability to function reliably over time, particularly under fluctuating loads.
- End-to-End Testing: Tests the full functionality of the API within the context of the entire application workflow.
3. API Testing Process:
A structured approach to API testing helps streamline efforts and maximize test coverage. Here’s a breakdown of the typical process:
Step 1: Define the Scope and Requirements
- Understand Requirements: Gather detailed API specifications, such as request parameters, response formats, and expected behaviour.
- Set Test Objectives: Define what you want to achieve with testing (e.g., validating functionality, ensuring security, checking load handling).
Step 2: Establish Test Cases
Create specific test cases based on the requirements, including positive and negative test scenarios. Test cases should cover:
- Valid and invalid requests
- Boundary conditions
- Different data types
- Error handling scenarios
Step 3: Choose Testing Tools
Select tools that suit your testing needs and environment. Some popular API testing tools include:
- Postman: Great for manual and automated API testing.
- JMeter: For load and performance testing.
- SoapUI: For comprehensive functional and security testing.
- Rest-Assured: A Java-based library for automated testing of REST APIs.
- Newman: A command-line tool that works well with Postman for CI/CD.
Step 4: Test Execution
- Run Tests: Execute the tests in a controlled environment, simulating real-life API interactions.
- Log Results: Collect responses, document errors, and measure response times to ensure the API meets defined expectations.
Step 5: Validation and Verification
Use assertions to validate:
- Response Status Codes: Ensure correct status codes are returned (e.g., 200 for success, 404 for not found, 500 for server errors).
| Status Code | Description | Typical Use Case |
|---|---|---|
| 200 | OK | Successful GET request. |
| 201 | Created | Resource creation (e.g., POST request). |
| 204 | No Content | Resource successfully deleted (DELETE). |
| 400 | Bad Request | Malformed or invalid request. |
| 401 | Unauthorized | Missing or invalid authentication. |
| 403 | Forbidden | Access denied despite authentication. |
| 404 | Not Found | Resources do not exist. |
| 500 | Internal Server Error | General server error. |
| 503 | Service Unavailable | Server temporarily unable to process. |
- Response Body: Validate the structure and content of the response body, checking that fields, data types, and values match expectations.
- Headers and Authentication: Check required headers and validate authentication mechanisms.
4. Introduction to the Layered Architecture:
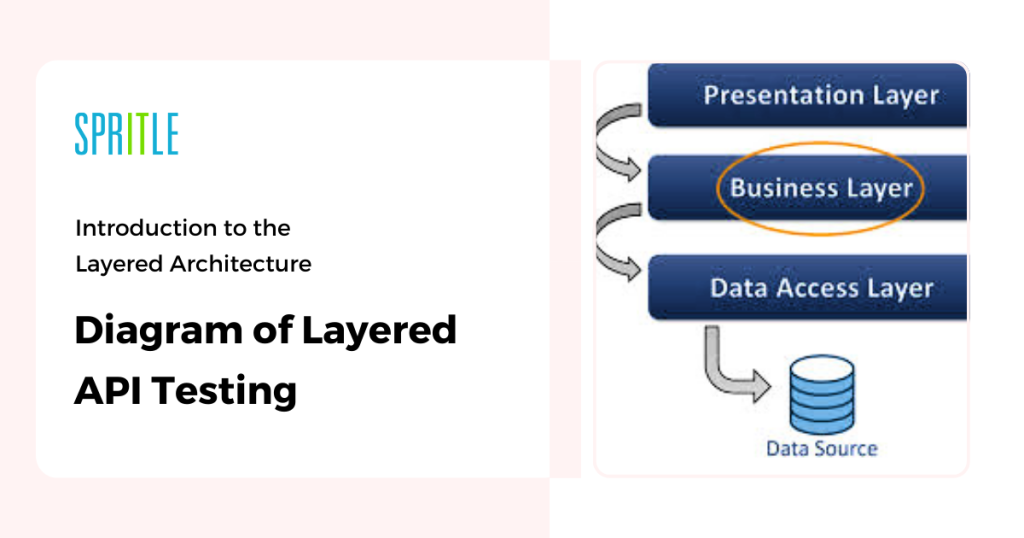
Modern applications are typically designed with a three-layer architecture, often represented as follows:
- Presentation Layer: The user-facing interface, which could be a web or mobile application.
- Business Layer: The core logic that processes requests and manages the application’s functions.
- Database Layer: The storage layer, which handles the application’s data management.
This layered structure allows for scalability, modularity, and easier maintenance. Let’s dive into how each layer functions and how to use Postman to test APIs that interact with each layer.
Diagram of Layered API Testing
Here’s a sample visual diagram to illustrate the flow and testing at each layer:
How the Layers Interact in API Testing?
- Presentation Layer: Receives inputs (e.g., login, submit form), sends them to the Business Layer.
- Business Layer: Processes the inputs, applies business rules, interacts with the Database Layer as needed.
- Database Layer: Stores or retrieves data based on the Business Layer’s requests.
i) Presentation Layer
What is the Presentation Layer?
The Presentation Layer is where users interact with the application. It usually consists of a graphical user interface (GUI), such as a web or mobile app. This layer communicates with the Business Layer through API requests.
Testing the Presentation Layer with Postman
Even though Postman is primarily used for backend API testing, you can still simulate how the Presentation Layer interacts with the Business Layer. For example:
- User Scenarios: Simulate user actions like logging in, viewing data, or submitting forms by sending requests to the API endpoints that the UI would call.
- Endpoint Verification: Check that the endpoints used by the UI return the correct data in response to different requests.
Example
In Postman:
- Create a request that mimics a user login (POST /login).
- Include parameters like username and password in the request body.
- Check the response status and response body to ensure it matches what the UI would display (e.g., success message or user data).
ii)Business Layer
What is the Business Layer?
The Business Layer contains the core logic that processes user inputs, manages interactions, and enforces business rules. When an API request is received, it’s passed to the Business Layer, which processes the logic and returns a response.
Testing the Business Layer with Postman
In the Business Layer, you can test different scenarios to ensure the logic behaves as expected. This often includes:
- Functional Testing: Ensuring the logic in the Business Layer functions as expected. For instance, a “calculate discount” API should correctly apply discounts based on rules in the Business Layer.
- Validation Testing: Check input validations by sending various data types and edge cases.
- Error Handling: Send invalid data to verify that the API gracefully handles errors and returns the expected error codes and messages.
Example
In Postman:
- Send a POST request to /applyDiscount, including a payload with product and discount details.
- Check if the response accurately reflects the expected discount or returns an appropriate error if the input is invalid.
iii)Database Layer
What is the Database Layer?
The Database Layer is responsible for data storage, retrieval, and management. It ensures that the application’s data is saved and can be accessed by the Business Layer when needed.
Testing the Database Layer with Postman
- Data Integrity Testing: Perform create, read, update, and delete (CRUD) operations via API requests and confirm the data reflects these changes accurately.
- Query Validation: Ensure that API responses include the correct data based on request parameters.
- Post-Request Validation: After sending a request (e.g., creating a user), verify that the database has been updated by sending a GET request to retrieve the data.
Example
In Postman:
- Send a POST request to /createUser, including user data in the request body.
- After sending the request, send a GET request to /getUser with the user ID.
- Verify that the response matches the data you initially sent.
5. API Testing Overview:
API (Application Programming Interface) testing focuses on verifying that different software components can communicate effectively. In the context of client-server architecture, an API allows the client (such as a frontend application or mobile app) to send requests to a server, which then processes these requests and sends back responses.
1. Client-Server Architecture:
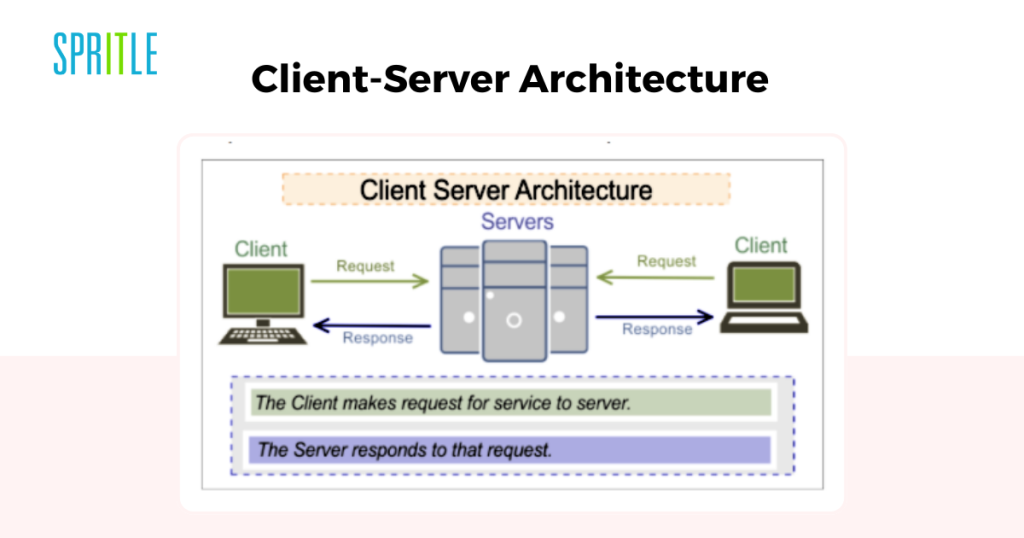
In client-server architecture:
- The Client (e.g., a web browser or mobile app) initiates requests, usually through an API.
- The Server (backend server or database server) processes these requests, executes any necessary business logic, and returns a response.
In API testing, you act as the client using a tool like Postman to send requests to the API, simulating how a real application would interact with the backend server.
2. Types of API Requests and Explanation:
APIs commonly use HTTP requests, which are grouped into four primary types:
- GET : Retrieves data from the server.
Example: A GET request to /users would retrieve a list of all users.
- POST : Sends data to the server to create a new resource.
Example: A POST request to /users with user details in the request body creates a new user in the database.
- PUT : Updates an existing resource on the server.
Example: A PUT request to /users/1 with updated data changes details of the user with ID 1.
- DELETE : Removes a resource from the server.
Example: A DELETE request to /users/1 would delete the user with ID 1.
3. Example of API Request and Response
Let’s walk through a basic API request and response flow:
- To integrate with the ReqRes API (https://reqres.in/api/), you can use Postman to send requests, interact with its endpoints and get the response.
- I’ll guide you through setting up a few example requests, such as GET, POST, PUT, and DELETE methods.
Step 1: Open Postman
- Open Postman on your computer.
Step 2: Choose an Endpoint
ReqRes offers several endpoints for testing, including:
- https://reqres.in/api/users (to list users or create a new user)
- https://reqres.in/api/users/{id} (to get, update, or delete a user by ID)
Step 3: Set Up and Test Requests in Postman
1. GET Request to List Users
- Method: GET
- URL: https://reqres.in/api/users?page=2
- Purpose: Retrieves a list of users on page 2.
In Postman:
- Set the method to GET.
- Enter the URL: https://reqres.in/api/users?page=2
- Click Send.
- View the response, which should contain a JSON array of users.
2. POST Request to Create a User
- Method: POST
- URL: https://reqres.in/api/users
- Headers: Set Content-Type to application/json.
Body: json
In Postman:
- Set the method to POST.
- Enter the URL: https://reqres.in/api/users
- Go to the Body tab, select raw, and set the type to JSON.
- Enter the JSON body above.
- Click Send.
- The response should include the details of the newly created user along with an ID and timestamp.
3. PUT Request to Update a User
- Method: PUT
- URL: https://reqres.in/api/users/2
- Headers: Set Content-Type to application/json.
Body: json
In Postman:
- Set the method to PUT.
- Enter the URL: https://reqres.in/api/users/2
- Go to the Body tab, select raw, and set the type to JSON.
- Enter the JSON body above.
- Click Send.
- The response should show the updated user information with the current timestamp.
4. DELETE Request to Remove a User
- Method: DELETE
- URL: https://reqres.in/api/users/2
- Purpose: Deletes the user with ID 2.
In Postman:
- Set the method to DELETE.
- Enter the URL: https://reqres.in/api/users/2
- Click Send.
- You should receive a 204 No Content response, indicating the user was deleted.
Conclusion:
API testing is a foundational aspect of modern software development, ensuring that APIs are functional, secure, and performant. By following a structured methodology, leveraging the right tools, and implementing best practices, you can optimize your API testing process. As the demand for robust APIs continues to grow, investing time and resources in API testing will improve your product’s reliability, user experience, and long-term success.
